| Oracle Enterprise Manager Administrator's Guide | Library |
Product |
Contents |
Index |
| Oracle Enterprise Manager Administrator's Guide | Library |
Product |
Contents |
Index |
![]()
![]()
The tasks are grouped by the destination of the task:
You can combine two or more pre-defined tasks into one job, called a composite job. Composite jobs can contain test conditions based on the success of a task. For example, if a composite job consists of two tasks, starting up a database and then running a SQL script, you can specify that the script be run only if the database was successfully started.
You can create jobs that can be used as fixit jobs for event conditions that are monitored with the Event Management System. Fixit jobs cannot be scheduled. See Chapter 5, Event Management for information on monitoring events in the system.
Note:
You need to set up a password file to perform administration tasks, such as start up or shut down, on a remote database. See Administration of a Remote Database on page 1-15.
Job Credentials
Jobs are normally run with the user preferences of the administrator who submitted the job. This means that jobs cannot be used to perform functions the administrator could not perform if logged into the machine directly.
Submitting Jobs
The Job system is simple to use because the task of scheduling and managing jobs is centralized in the Enterprise Manager Console. The administrator only needs to submit a job once, regardless of the number of destinations on which the job will run or the number of times the job will be run.
There is usually a slight delay between the submitting the job and the notification by the agent.
Jobs can only be run on nodes where an intelligent agent is running. If you send a job to a group, the job is only scheduled on the nodes in the group where the agent is running. Job Window
You can view the different pages of job information by selecting the page tabs in the Job window. The pages in the Job window are:
The Job window can be hidden or shown by selecting Job in the Console View menu. You can also hide or show the window by clicking on the Job system icon in the Console toolbar.
See Figure 4-1: Job Window in the Console for an illustration of the Job Scheduling window.
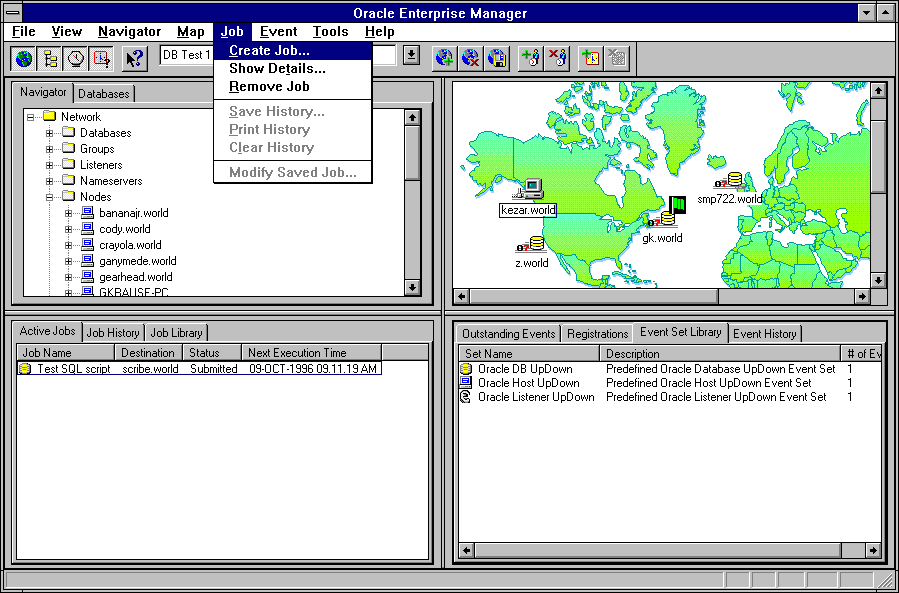
Figure 4-1: Job Window in the Console
Active Jobs
The Active Jobs page contains a summary of the active jobs on the network. These are jobs that you have submitted to the job system and are not yet completed. Each row is an execution of a particular job scheduled on a specific destination. While a job may execute multiple times, the job listed in the Active Jobs page is the one that is currently scheduled or running. You can use the Show Details menu option to display the details of the selected job. You cannot modify these jobs.
You can double-click on a job listed in the Active Jobs page to view the job details.
Note:
When you submit or delete a job, there is usually a slight delay while the agent processes the request.
Allows you to create a new job. See Creating, Modifying, or Viewing a Job on page 4-9.
Show Details
Displays the property sheet for the selected job in the Active Jobs page of the Job window. The property sheet is in read-only format. Active jobs can be removed but not modified. See Creating, Modifying, or Viewing a Job on page 4-9.
Remove Job
Removes the selected job from the Active Jobs page of the Job window. If you experience problems removing a job, see the Delete option of the Daemon Manager Menu on page 6-10.
Save History
Saves the contents of the Job History page to a text file. Enter a valid file name or select an existing file in the file selection dialog box.
Prints the jobs listed in the Job History page.
Clears the jobs listed in the Job History page.
Allows you to modify the job selected in the Job Library page of the Job window. The property sheet is the same as the property sheet for creating a new job. See Creating, Modifying, or Viewing a Job on page 4-9.
Submit Saved Job
Submits the selected saved job to the Job system. Context-Sensitive Menus
If you select an item in the Job window with the right mouse button, the context-sensitive menu for that item appears. This menu is a subset of the Job menu. Creating, Modifying, or Viewing a Job
When you create, modify, or view details of a job, similar property sheets display. The contents of the Create Job and Job Details property sheets are nearly identical. See Figure 4-2: Job Property Sheet for an illustration of a Job property sheet. The property sheets contains:
Note:
Job Name
Description
Fixit Job
The job can be selected from the Fixit Job list in the Event Set Management Parameters page after it has been successfully submitted to an agent. See Creating or Modifying an Event Set on page 5-13.
Destination Type
Select the destination type from the pull-down list: Database, Listener, Node, or Names Server.
Select the destinations of the job in the Available Destinations list and click the << (Add) button to move the destination to the Selected Destinations list. 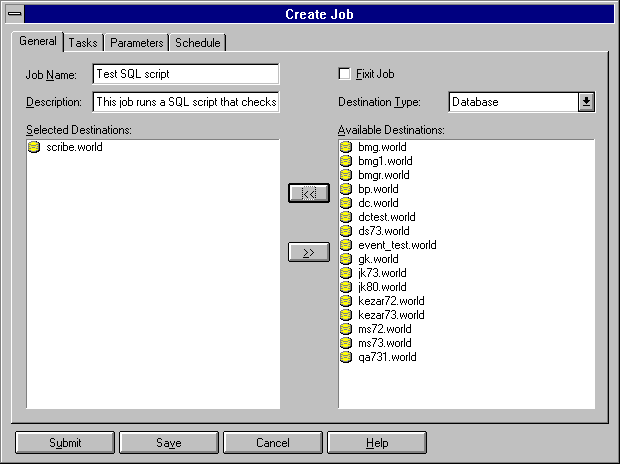
Figure 4-2: Job Property Sheet
Task Page
The Task page allows you to choose the tasks that you want the job to perform.
Select a task and click on the << (Add) button to include the task in the job. You can add multiple tasks to the job from the Available Tasks scrolling list.
For information on predefined job tasks and their parameters, see the online help for predefined job tasks.
You can remove tasks from this list. Select the task and click on the >> (Remove) button. Parameters Page
On the Parameters Page, you specify parameter settings for the selected job tasks. To set the parameters for a task, select the task in the Selected Tasks list. The parameters for the selected task are displayed on the right side of the Parameters Page.
Select the task that you want to set parameters for.
Specify the parameters for the selected task. You can enter values in the entry boxes or select values from the pull-down lists. The parameters vary according to the job task.
For information on predefined job tasks and their parameters, see the online help for predefined job tasks.
Schedule Page
The Schedule page allows you to schedule the execution of the job task.
Select the frequency that you want the task executed. The choices are Immediately, Once, On Interval, On Day of Week, and On Date of Month.
Choose the first date and time that you want the task executed. This is the starting time for any task scheduled on an interval.
Choose the last date and time that you want the task executed. This option does not apply if you chose the Immediately or Once execution options.
Select the time zone from the pull-down list. The choices are Agent, Console, and GMT. Progress Page
The Progress page contains all notifications that have been received for a specific job. Each row in the page summarizes a status change of the job.
Note:
The columns contain the following information:
Job Type
Status
For information on the status of a job, see Active Jobs on page 4-5 and Job History on page 4-6.
Destination
This is the destination of the specific occurrence of the job.
This is the time the Console was notified.
Select the destination of the job occurrences you want to view from the pull-down list. Select <All> for all destinations. The list of job occurrences changes according to the selection.
Select the execution time of the job occurrences you want to view from the pull-down list. Select <All> for all executions. The list of job occurrences changes according to the selection.
Select the Save As button to save the list of job occurrences as a local file using the standard Windows file dialog box.
Select the Print button to print the list of job occurrences in the Progress page.
If output exists for an occurrence of a job, you can display the output in the Output dialog box. To display any existing output: Output Dialog Box
The Output dialog box displays any output as a result of the execution of an occurrence of a job.
If no output is produced by a job, a message displays that states that there is no output for the job. If the output includes only blank spaces, the dialog box is blank.
Select the Save As button to save the output as a local file using the standard Windows file dialog box.
Select the Close button to exit the dialog box after viewing it.
Select the Print button to print the contents of the dialog box.
Select the Job Definition button to display more details.
|
Prev Next |
Copyright © 1996 Oracle Corporation. All Rights Reserved. |
Library |
Product |
Contents |
Index |