Oracle Enterprise Manager Administrator's Guide Go to Product Documentation Library
Library
Go to books for this product
Product
Go to Contents for this book
Contents
Go to Index
Index


Go to previous file in sequence Go to next file in sequence

Navigator


The Navigator discovers and graphically displays network objects, and allows you to admininster the objects. The Navigator tree displays a direct view of the network's nodes and services, the objects they contain, and the relationships among objects. The topics discussed in this chapter include:

Navigator Window

The Navigator window provides:

The Navigator window can be hidden or shown by selecting Show Navigator Pane in the Console View menu. You can also hide or show the window by clicking on the Navigator icon in the Console toolbar.

Each object type in the Navigator tree is identified by an icon and name. If there is a '+' or '-' to the left an object's icon and name, the object is a container that can be expanded to display other objects. A container that is represented by a folder icon is a logical grouping, or collection, of one specific type of object, such as databases, tablespaces, or users. Other containers are objects that hold multiple types of objects.

The top-most object in the Navigator tree is the network container. The network folder contains:

See Figure 2-1: Navigator Menu and Window for an illustration of a Navigator window.

You can expand the tree containers to view the objects and relationships in the environment. For example, you can expand a node to view the databases, Names Servers, and listeners on the node.

You can expand the Groups folder to view the user-defined groups.

You can expand a database to view:

See the specific DBA tools chapter that administers an object for more information on an object's relationships.

Figure 2-1: Navigator Menu and Window

Tree Population

The Console populates the Navigator tree with information the communication daemon discovers about the services in a SQL*Net network. These services include:

If the 7.3.3 Intelligent Agent is installed, the Navigator Discovery feature is used to populate the Navigator tree with information obtained from the Intelligent Agent. With Intelligent Agent releases prior to 7.3.3, the Communication Daemon discovers services by reading the topology.ora file. Using the information in the topology file, the daemon provides the network services to the Navigator.

Note:
If you remove a database, name server, listener, or node object from the Navigator tree and the topology file is used for discovering services, the entry for the object must also be deleted from the topology.ora file. Use Oracle Network Manager to update the topology file. If you drop the objects without updating the topology file, the objects will appear again in the Navigator tree when you restart Enterprise Manager.

Note:
If you change or update the topology file and restart Enterprise Manager, the entries in the previous topology file will still appear in the Navigator tree until you remove them from the tree list.

For more information on the Communication Daemon, see Chapter 6, Agents and Communication Daemon. For information on the configuration files, see the Oracle Enterprise Manager Installation Guide.

Viewing Specific Tree Objects

In large, complex environments you may not wish to view the entire system in one tree so the Navigator has been designed to be highly flexible.

With the Split View menu option, you can split the Navigator tree into views that are displayed in separate pages in the Navigator window. Simply click on the tab of a page to move the page and its contents to the front of the Navigator window.

With the Filter Folder menu option, you can filter the objects in a folder in the Navigator window allowing you to determine which objects are displayed. In a very large system, this option allows you to display only those objects that you need to access. You can use standard SQL wildcard characters when entering the filtering criteria.

Launching Tools

Before you launch a database tool from the Console, select a database or database object in the Navigator tree. You can execute a tool from the Tools menu or by choosing the Related Tools option from the right-mouse menu.

You are connected to the database according to the user preferences that have been set up for the database or the credentials you used to log on to the Console. If connection to the database fails for any reason, the Login Information dialog box displays. For information about connecting to an instance of a database, see Connecting to an Instance on page 1-17. For information on user preferences, see Console User Preferences on page 1-19.

User-defined Groups

User-defined groups are created with the Create Group option of the Map menu. The group types are:

You can use groups to organize related objects in the tree. For information on groups, see User-Defined Groups on page 3-3.

Creating Maps

You can drag and drop nodes, databases, groups, listeners, and names servers from the Navigator tree to the Map window to add those objects to a map. See Manipulating Map Views on page 3-2.

Navigator Menu

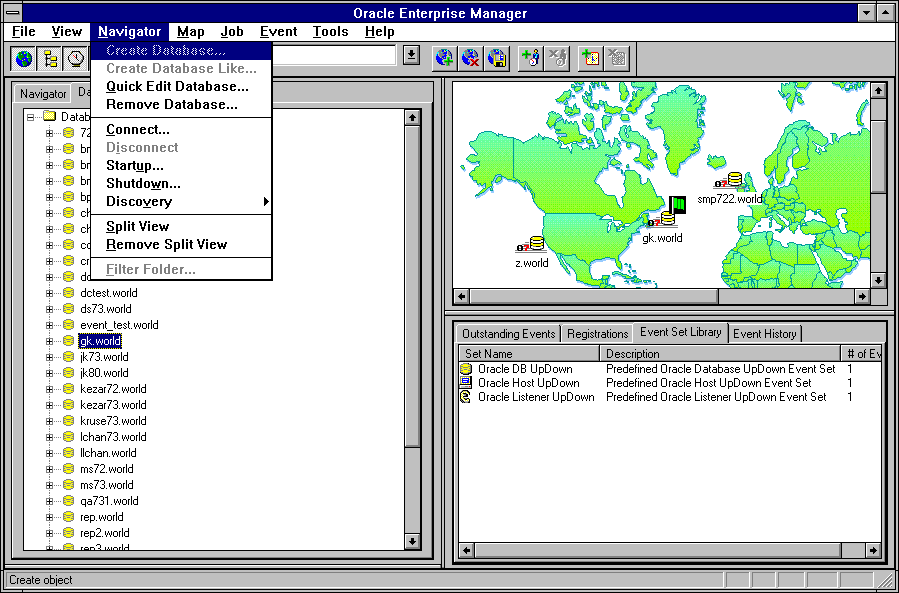
The Navigator menu allows you to manage objects in the Navigator window. The menu options are enabled according to the object selected in the Navigator tree. Usually the Create, Create Like, and Quick Edit menu options are available when an object is selected. See Figure 2-1: Navigator Menu and Window for an illustration of the Navigator menu.

Note:
For information on operations for an object type, see the chapter in this guide that discusses the specific application that manipulates the object type. For example, if you want information on the create or alter property sheet of user, profile, or role object types, see Chapter 9, Controlling Database Security. For an overview of the database application tools, see Chapter 7, Overview of the Database Tools.

Create Object
Allows you to create a specified object type.

Create Object Like
Allows you to create an object similar to the selected object in the tree list.

Quick Edit Object
Allows you to alter or edit an object of a specified type. The Object is determined by the type of the object selected in the tree list.

Remove Object
Allows you to delete all occurrences of the object selected in the tree list.

Suggestion:
It is often much easier to Filter Folders than remove objects in the Navigator tree. Filtering allows you to quickly include the object in the tree if necessary at a later time.

Note:
To remove a node from the Navigator tree that has been discovered with the Discovery Background option, you must first remove the node from the node list. Then remove the node from the tree with the Navigator Remove option.

Connect
Displays the Login Information dialog box to connect to a database instance. For information about connecting to an instance of a database, see Connecting to an Instance on page 1-17.

Disconnect
Disconnects from a database instance.

Startup
Starts up a database. See Chapter 10, Managing Instances and Sessions.

Shutdown
Shuts down a database. See Chapter 10, Managing Instances and Sessions.

Discovery
Discovers services on a node in the network. You can also display the status of network services. See Discovering Services on page 2-8.

Split View
Creates a new view page in the Navigator window that contains only the currently selected object, such a single folder or a single user. Click on the tab of a page to move the page and its contents to the front of the Navigator window.

For example, to create a new view that contains a specific object, such as the DEMO database:

1.
Select the DEMO database in the tree.
2.
Select the Split View menu option to create a separate view in the Navigator window.
Remove Split View
Removes the current split view from the Navigator. Make sure the view that you want to delete is at the front of the Navigator window.

Filter Folder
Filters a folder contents based on the criteria you enter in the filter dialog box. You can use SQL operators in the criteria field. See Filtering Folders on page 2-11.

Navigator Context-Sensitive Menus

For example, if you click the right mouse button on a user, such as SCOTT, the following menu options would display:

Note:
Related Tools in this example are the database tools that administer users. In this case, Security Manager is a related tool.

For information on menu options for an object type, see the chapter in this guide that discusses the specific application that manipulates the object type. For example, if you want information on the menu options for user, profile, or role object types, see Chapter 9, Controlling Database Security. For an overview of the database application tools, see Chapter 7, Overview of the Database Tools.

Manipulating Objects in the Navigator

The Navigator interface provides easy manipulation of the objects in the tree list.

Discovering Services

The Navigator Discovery feature provides a method of populating the Navigator tree and identifying the network services that the Oracle Enterprise Manager will administer. This feature works only with nodes that have the Intelligent Agent release 7.3.3 installed and running.

After the 7.3.3 Intelligent Agent is installed and running, you must use the Navigator Discovery feature to discover the node where it is located.

Note:
You can continue to use a topology.ora file, in addition to the Discovery feature, for nodes that do not have the 7.3.3 agent installed or cannot be discovered due to non-TCP/IP network configurations. The entries in the topology.ora file will also be used to populate the Navigator tree. See the Oracle Enterprise Manager Installation Guide for information on configuration files.

Wizard Option

The Wizard option allows you to select the nodes you want to display in the Navigator and manage with Oracle Enterprise Manager. There are two types of discovery:

To specify a node that you want to display in the Navigator tree, you enter the name or address of the node in the Node/IP Address field in the Wizard page. You can also use the Load option to load a text file that contains the list of node names or addresses that you want to display.

After you complete the Wizard fields and select OK, the node and its services are discovered, and status of the current discovery is displayed. See the Navigator online help for more information on the Discovery feature.

Status Option

The Status option displays the status of the current discovery process. The node name and information about the most recent discovery attempt is displayed.

You can stop the current discovery process with the Stop Discovery button.

Update SQL*Net Option

This option updates the SQL*Net configuration file (tnsnames.ora) with current Discovery information. It should be run after a Discovery operation.

Expanding and Collapsing Objects

The Navigator tree provides various methods for expanding and collapsing objects.

Note:
The tree list display is often the result of queries executed on a database over a network. Because of this, there may be a delay when expanding a container.

For information on the user preferences, see Console User Preferences on page 1-19. For information about connecting to an instance of a database, see Connecting to an Instance on page 1-17.

Administering Objects

You can perform some of the administrative tasks that are in the DBA tool applications through the Navigator. The Navigator provides a subset of the options for administering an object.

For information on the property sheets, see the chapter on the DBA tool that administers the object.

For information on the user preferences, see Console User Preferences on page 1-19. For information about connecting to an instance of a database, see Connecting to an Instance on page 1-17. For information on the database instance property sheet, see Chapter 10, Managing Instances and Sessions.

Copying Tree Objects

You can drag and drop some objects in the tree list to make copies of the object in different locations. For example, you can drag and drop a user or role from one database to another to create an identical user in a different database.

Note:
If you drag and drop a user to a database where the user's Default or System tablespace does not exist, you are prompted to reassign the tablespace. If you choose to reassign the tablespace, the User property sheet displays. If you do not choose to reassign the tablespace, you cannot add the user.

Note:
If you attempt a drag and drop operation that cannot be done, a circle with a slash appears to alert you.

Filtering Folders

With the Filter Folder menu item you can filter folders to display specific sets of objects. When you select the Filter Folder menu item, the Filter Folder dialog box displays.

To Filter a folder:

1.
Select the folder you want to filter.
2.
Choose Filter Folder from the Navigator menu.
3.
Enter the criteria that you want to filter on in the Filter Text field. You can use SQL operators in the criteria field. The filter is case-sensitive.
4.
Click the OK button.
5.
Expand the folder to view the filtered contents if the folder is not already open.
To turn off filtering:

1.
Select the folder where you want to remove the filter.
2.
Choose Filter Folder from the Navigator menu.
3.
Check the Disable Filter box to turn off filtering.
4.
Click the OK button.


Go to previous file in sequence Go to next file in sequence
Prev Next
Oracle
Copyright © 1996 Oracle Corporation.
All Rights Reserved.
Go to Product Documentation Library
Library
Go to books for this product
Product
Go to Contents for this book
Contents
Go to Index
Index